

How to add products to your website using Network Solutions?
5 min read StaffCloud
In today's digital age, maintaining a strong online presence is essential for business success. Network Solutions offers an extensive array of services designed to help you establish, manage, and enhance your online visibility. Whether you're starting a new business or growing your digital footprint, Network Solutions has the tools and expertise to assist you every step of the way.
How to Add a Single Product on Network Solutions?
- Log In to Your Account Sign in to your Network Solutions account. Click 'CONTINUE TO ACCOUNT MANAGER'.
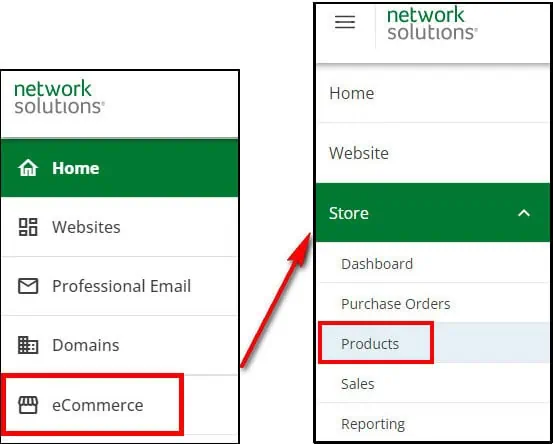
- Access eCommerce Section From the menu ribbon, go to the eCommerce section. Under 'Store', select 'Products'.
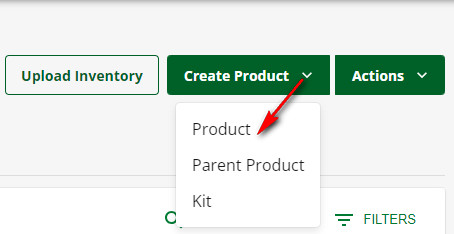
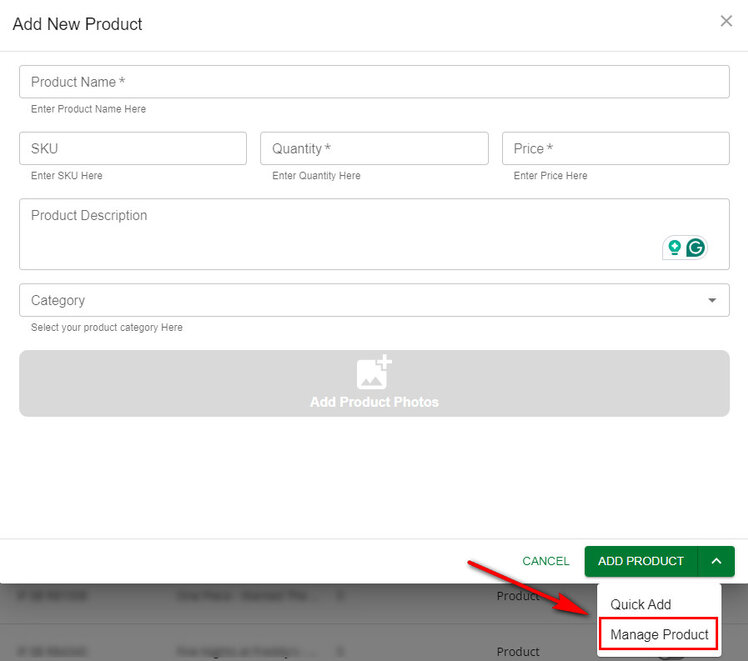
- Enter Product Details Click on Create Product. Add the Product Name, unique SKU, and Quantity. Fill in the Product Description, add Category and product images, choose the ‘Manage Product’ option from the Add Product Dropdown, and fill in the necessary details.
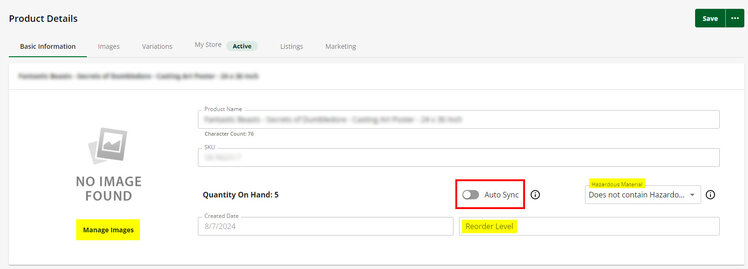
- Basic Information Add or edit the basic product details and manage images here. Set Reorder Level to get stock alerts. Turn on Auto Sync to update sales channels automatically.
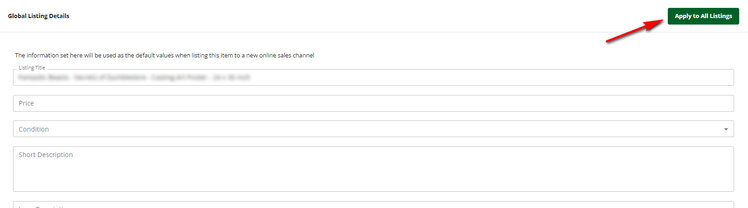
- Global Listing Details Enter the Listing Title, Price, and Condition. Add a Short Description and a Long Description. If your catalog contains similar products, you can apply these details to all listings by clicking the 'Apply to All Listings' button.
- Dimensions Enter product Length, Width, Depth, Major Weight, and Minor Weight. Check the Unit of Measurement.
- Warehouse Information Set up Aisle and Bin details. Specify the product Quantity for each Warehouse. Click 'Manage Warehouse' to edit or add new ones.
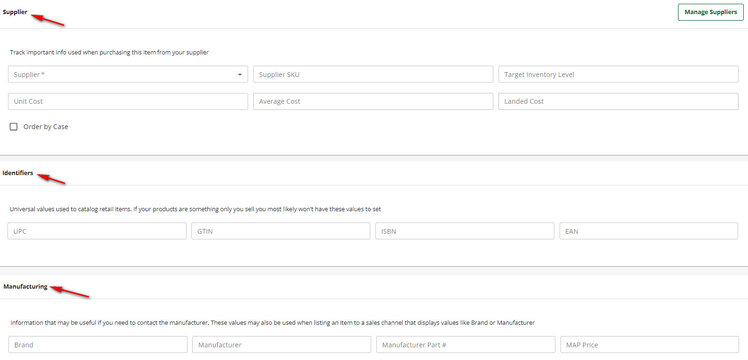
- Supplier Information Choose an existing Supplier or click 'Manage Suppliers' to add a new one. Add a Supplier SKU. Enter Target Inventory Level, Unit Cost, Average Cost, and Landed Cost.
- Identifiers Add UPC, GTIN, ISBN, and EAN codes for better search engine visibility.
- Manufacturing Details Enter Brand, Manufacturer, Manufacturer Part Number, and MAP Price.
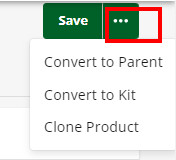
- Save and Manage Click 'Save' at the top-right. You can Clone or Convert to Kit the product using the horizontal ellipses.
- Add Product Images Go to the Images tab and click 'Upload Image'. Enter an image URL or upload a file (JPG, PNG, GIF). Note: You can upload up to 12 images. Update the Product Details in My Store: Next, to publish the new listing, head to the My Store tab to update your product listing details. In the My Store (Draft) Tab You can review and edit: Listing Title Short Description SKU (Auto-loaded from Product Details. Change it here to track under a different ID.) Quantity (Choose unlimited or set a specific number. Leave it as is to show actual quantity.) Product Images (Click Manage Images to upload or reorder by dragging.) Banner Field (Highlight with text like "New" or "Customer Favorite.") Description Box (Add a complete product description.) In the Pricing Section: Enter Listing Price or Direct Listing Price. Toggle ‘On Sale’ to set Discount % or Discounted Price. (Note: This sale will show with any sitewide sale from the Online Store settings tab.) Toggle ‘Product is Taxable’ to apply configured taxes. Under Meta Details: Add Meta Title, Meta Keywords, Image Tags, and Meta Description to boost product page ranking. In the Digital Product Section: Toggle Digital Product to upload files. Set Time-Based Expiration or Limit Download Attempts. (Note: If Digital Product is enabled, skip Fulfillment Types.) In the Category Section: Add your product to an existing category from the drop-down. The selected category will show in the Category Path field. Under Fulfillment Types: Select one option: Shippable (Set Shipping Price) Non-Shippable Free Shipping Local Pickup (Add Pickup Preparation Time for customer readiness) Shippable and Local Pickup (For products that can be shipped or picked up in-store) Then, click ‘Publish’ to make the product live



How do you import products in Bulk into Network Solutions?
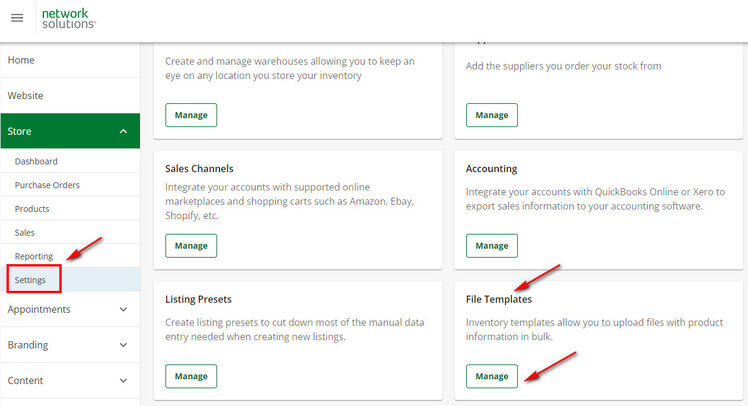
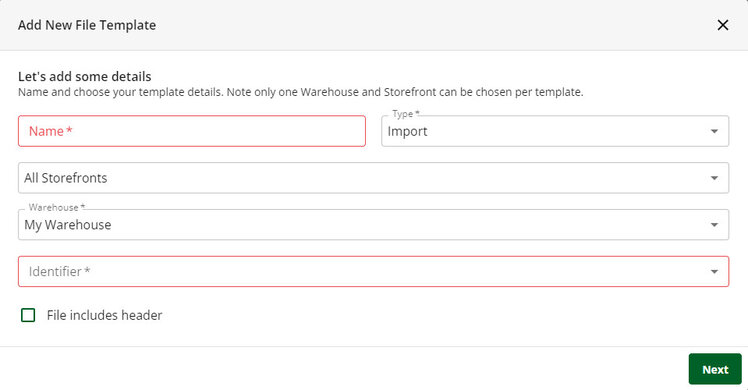
- Create a New Custom Inventory Template Go to your eCommerce Dashboard and click on ‘Store’ in the left menu. Select Settings from the drop-down. Click on Manage under the File Templates tile. You’ll be taken to the File Templates page, where you can create, edit, or download your inventory template. Click ‘Add New’ in the top-right corner of the File Templates page. Enter a Name for your template. Choose Import to create a Custom Import Template or Export for a Custom Export Template. Select the Storefront and Warehouse. Pick the Identifier (SKU, Warehouse SKU, Supplier SKU). Check File Includes Header if you want a header row. Click Next and then Add Attributes. Select and arrange attributes as needed. Click Save Template.
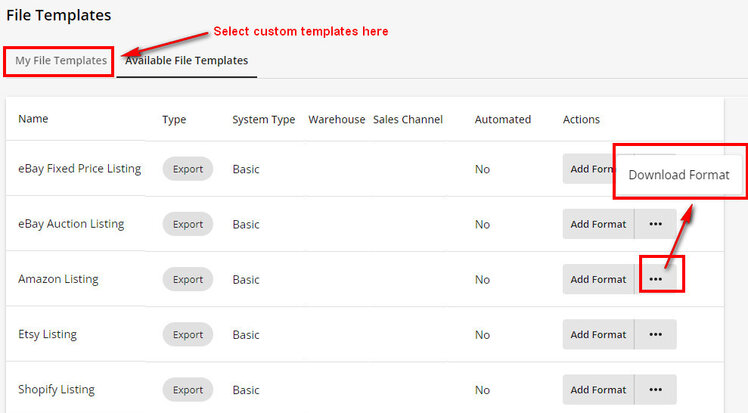
- Download an Inventory Template Choose a Custom or Default Template from the list. Click the ellipses on the right and select Download the template Format.
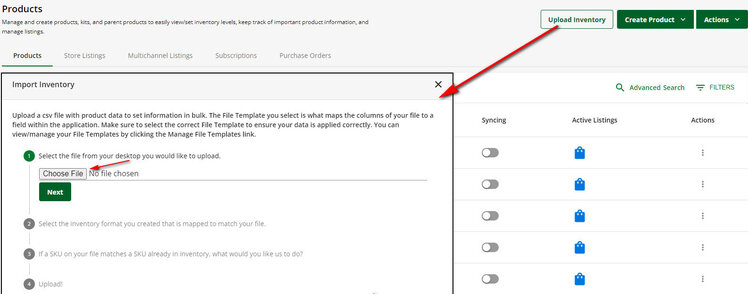
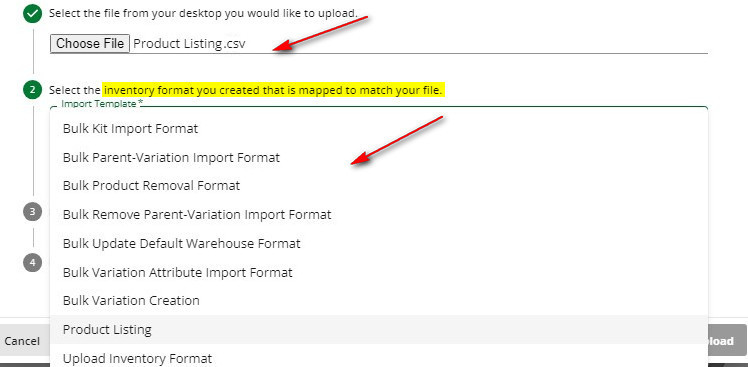
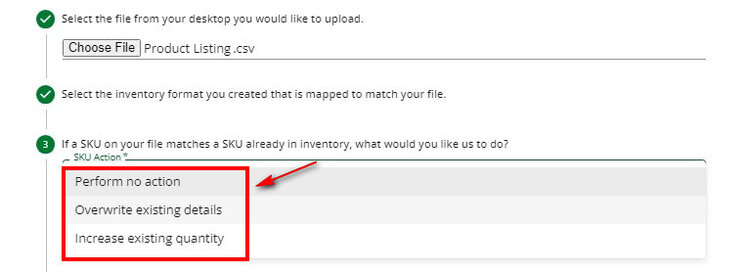
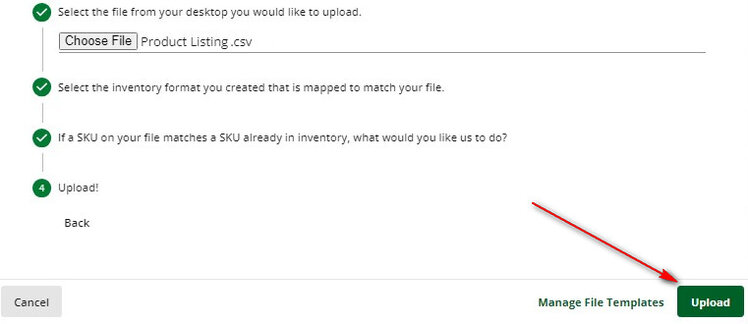
- Upload Your Template Fill in the downloaded CSV file template with your product details. Click Upload Inventory in your Dashboard. Select your filled file and the inventory format. If there’s an SKU match, choose the appropriate action. Click Upload.
- Publish Your Products Go to the ‘Products’ menu to find your uploaded listings. Click on a product to open its details in the next window. Fill out the information in the My Store (Draft) section, as above. Click the publish button and the products will be live. Once published, the status will change from My Store (Draft) to My Store (Active), and your products will appear on your website.
Discover Staffcloud, the perfect solution for sellers to streamline task management. We take care of everything—from creating new listings and uploading images to tracking updates and optimizing content on network Solutions. To explore more about our services, contact us at support@staffcloud.net or send us your questions here.
Related services
- eCommerce Order & Fulfillment Operations From purchase order to tracking number, across every channel you sell on. Explore service
- eCommerce Product Data & Catalog Management Attributes, matching, pricing compliance and catalogue syndication. Explore service
- eCommerce Retail Systems & EDI Integrations Retailer portals, EDI, ERP and the disputes that come out of them. Explore service
More articles in eCommerce Platforms
-
 7 August 2025
How to Edit Product Descriptions and Images in Magento? A Complete Guide
Magento is a powerful open-source eCommerce platform. Used by a wide range of businesses to build, operate, and grow the
7 August 2025
How to Edit Product Descriptions and Images in Magento? A Complete Guide
Magento is a powerful open-source eCommerce platform. Used by a wide range of businesses to build, operate, and grow the
-
 7 July 2025
How to Scale Multichannel E‑commerce with ChannelEngine?
In the current e-commerce environment, expanding your reach across multiple marketplaces is no longer a choice—it's a ne
7 July 2025
How to Scale Multichannel E‑commerce with ChannelEngine?
In the current e-commerce environment, expanding your reach across multiple marketplaces is no longer a choice—it's a ne
-
 22 July 2024
How to Convert Seller-Fulfilled Items to Walmart Fulfillment Services (WFS)?
If you’re a Marketplace seller with an existing catalog, you might want to start using Walmart Fulfillment Services (WFS
22 July 2024
How to Convert Seller-Fulfilled Items to Walmart Fulfillment Services (WFS)?
If you’re a Marketplace seller with an existing catalog, you might want to start using Walmart Fulfillment Services (WFS