
How to Receive Payments and Book Carrier Bills in QuickBooks?
2 min read StaffCloud
Accurate payment processing and carrier bill booking are vital for streamlined bookkeeping. QuickBooks bookkeeping services automate these core accounting tasks - enhancing cash flow management, compliance, and overall financial clarity.
Efficient financial workflows drive growth and foster strong vendor relationships. QuickBooks delivers automated payment reconciliation, freight invoice entry, and real-time expense tracking -simplifying day-to-day accounting for small businesses.
📌 Why Use QuickBooks for Payment and Bill Management?
- Flexible payment methods: Credit cards, ACH, PayPal, and more are supported.
- Real-time financial overview: Instantly track your cash position and due payments.
- Scalable for small businesses: Ideal for growing companies needing robust bookkeeping solutions.
This guide walks you through a clear, step-by-step QuickBooks process for handling customer payments and carrier bills - helping your business maintain accuracy, stay compliant.
Receiving Payments from Customers in QuickBooks
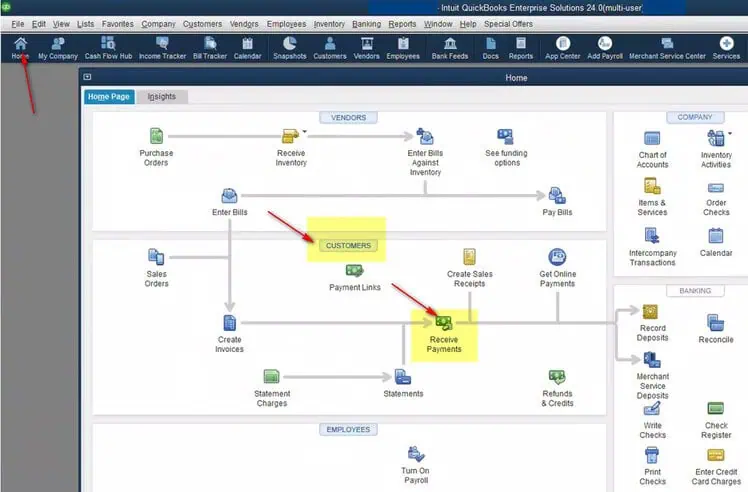
- Navigate to “Receive Payment”
- Go to the Customers menu
- Click on Receive Payments.
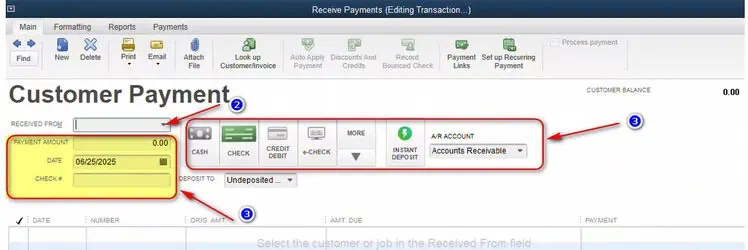
- Select the Customer Choose the customer who made the payment from the "Received From" dropdown menu
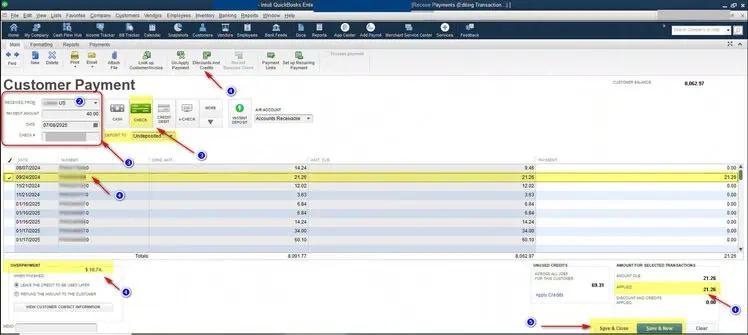
- Enter Payment DetailsEnter the amount receivedSelect the payment method (e.g., bank transfer, cheque)Choose the deposit account (e.g., Undeposited Funds or directly into your bank account)Check reference number and date of the check
- Apply to InvoiceSelect the invoice(s) to apply the payment toThe applied amount after selecting the invoices will appear in the right bottom boxAny discounts should be applied from the “Discounts and Credits” menu from the top menu bar to adjust the applied amount equal to the payment amount
- Save TransactionChoose "Save & Close" to finish, or "Save & New" to continue adding entries
Booking Carrier Bills in QuickBooks
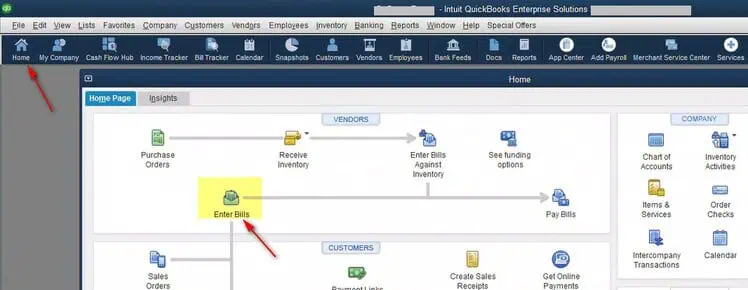
- Go to “Enter Bills”Navigate to the Vendors menuClick Enter Bills
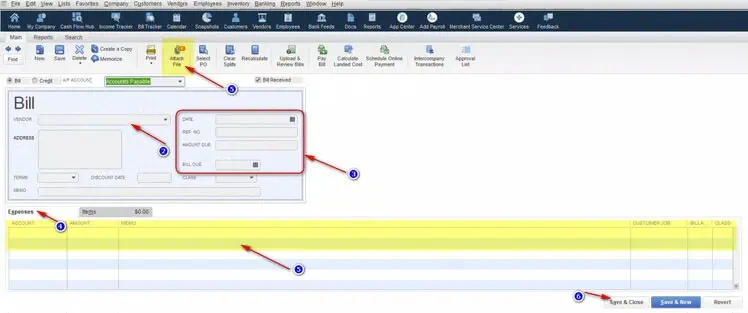
- Select the CarrierChoose the freight or courier company from the vendor list
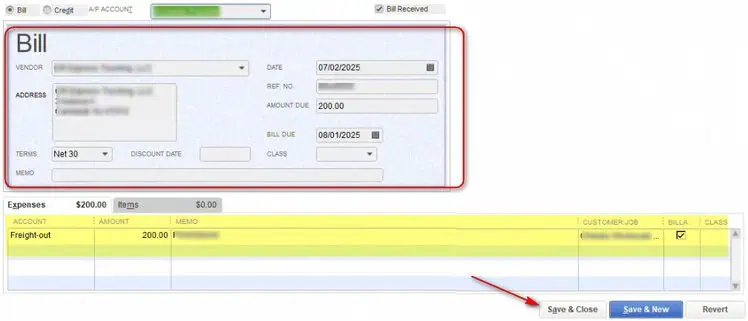
- Enter Bill DetailsAdd the bill date, number, and due dateAdd a reference for the shipment if needed
- Assign ExpensesChoose the correct expense account (e.g., Shipping/Freight)Add description, amount, and class/location if applicable
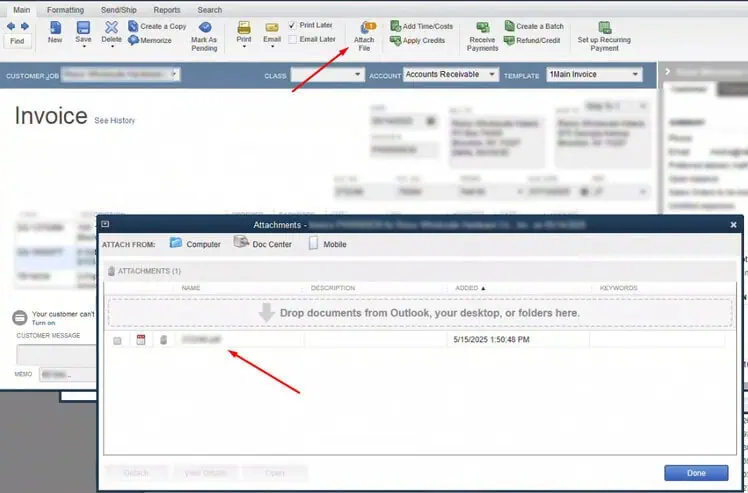
- Attach Documents (Optional)Upload scanned carrier invoices or delivery notes for record-keeping
- Save the BillClick Save & Close to complete
Tips 💡
- Run Accounts Receivable and Payables Summary reports to track outstanding invoices and bills
- Use Bank Reconciliation to match payments and expenses with bank transactions
- Set reminders or automated payments for carrier invoices with due dates
Why StaffCloud?
At StaffCloud, we simplify accounting operations by integrating tools like QuickBooks with your logistics and sales workflows. From payment processing to freight invoice tracking, we help reduce manual errors and boost accuracy.
Need help setting up your accounting system? Contact StaffCloud and let’s optimize your financial processes today.
Related services
- eCommerce Retail Systems & EDI Integrations Retailer portals, EDI, ERP and the disputes that come out of them. Explore service
- eCommerce Order & Fulfillment Operations From purchase order to tracking number, across every channel you sell on. Explore service
- BPO Data Entry & Document Processing Data entry, OCR and the document work that keeps records usable. Explore service
More articles in SaaS & Finance
-
 29 July 2025
How to Process Orders Using Goflow? A Step-by-Step Guide for E-Commerce Sellers
Managing orders efficiently is the backbone of any successful e-commerce business. Whether you're selling on Amazon, Wal
29 July 2025
How to Process Orders Using Goflow? A Step-by-Step Guide for E-Commerce Sellers
Managing orders efficiently is the backbone of any successful e-commerce business. Whether you're selling on Amazon, Wal
-
 22 July 2025
How to Streamline Multichannel Operations with Rithum? All-in-One E-Commerce Solution for Brands & Retailers
Begin by logging into the Rithum Order Stream dashboard. This is where you’ll monitor file availability and download pac
22 July 2025
How to Streamline Multichannel Operations with Rithum? All-in-One E-Commerce Solution for Brands & Retailers
Begin by logging into the Rithum Order Stream dashboard. This is where you’ll monitor file availability and download pac
-
 18 July 2025
How to Manage Invoicing Efficiently with Sage 100?
In the modern business landscape, efficiency, visibility, and control are critical for sustainable growth. That’s where
18 July 2025
How to Manage Invoicing Efficiently with Sage 100?
In the modern business landscape, efficiency, visibility, and control are critical for sustainable growth. That’s where